
If you run a domain or hosting reselling business through OrderBox, you probably know that the native payment gateway list is limited. OrderBox is the engine that powers platforms like ResellerClub, LogicBoxes, Resell.Biz, TrustP, and TheLogicBridge — and you may be using either the classic Supersite storefront or the modern WebPro Panel interface to serve your customers.
If you want to accept payments through modern providers like Razorpay, Stripe, PhonePe, Cashfree, or PayPal with extended methods, the official OrderBox guide asks you to download PHP integration kits, edit code files, handle MD5 checksums, and host a custom bridge on your server.
That works if you are a developer. Most resellers are not. You just want your customers to pay you, and you want the money to reach your account.
This guide is for you. There is a much simpler way — using a self-hosted WordPress plugin called Knit Pay. No coding. No custom files. No checksum math. Just configuration and go.
If you want to see the official technical documentation, ResellerClub publishes a detailed integration guide here: Integrating any other Payment Gateway with OrderBox. That page walks you through downloading PHP kits, editing code, and hosting your own bridge page. This blog covers the exact same outcome, but instead of writing code, you will use Knit Pay to set up everything through a simple configuration screen.
What You Will Need
- An active ResellerClub / LogicBoxes / OrderBox account.
- A payment gateway account — Razorpay, Stripe, PayPal, PayU, Cashfree, PhonePe, or any of the 500+ gateways Knit Pay supports.
- Your own hosting or server with PHP and MySQL (standard WordPress requirements).
- A WordPress site — this can be your main website or a dedicated subdomain like
payments.yourdomain.com.
If you already have a WordPress site and don’t want payment-related traffic mixed with your main content, installing WordPress on a subdomain is completely fine. If you don’t have WordPress at all, a clean subdomain install works perfectly. Your customers will never see the WordPress interface anyway — they stay on your OrderBox storefront the entire time.
One more thing — ResellerClub’s official documentation uses https:// in all Gateway URL examples. It is not stated as a hard rule in a separate policy, but every correct example they provide uses HTTPS. Since payment data and financial details are involved, we strongly recommend running your WordPress site with an SSL certificate. Most hosting providers include free SSL via Let’s Encrypt, and it takes just a few clicks to enable.
In the official OrderBox documentation, they mention that you need “Your Server” to host the integration code. In this guide, that server is your WordPress site running Knit Pay. Instead of manually uploading PHP files and editing checksum functions, WordPress + Knit Pay becomes your server — handling the entire bridge automatically.
Step 1 — Install WordPress on Your Hosting
If you don’t have WordPress yet, install it on your server. Many hosting providers offer one-click WordPress installation. If you prefer to keep payments isolated, create a subdomain like payments.yourdomain.com or a subdirectory like yourdomain.com/payments and install WordPress there.
This WordPress instance is just the backend engine. Your customers will never land on your WordPress dashboard or see WordPress branding. They will stay on your Supersite storefront or WebPro Panel, and WordPress only handles the silent redirect in between.
Step 2 — Install the Knit Pay Plugin
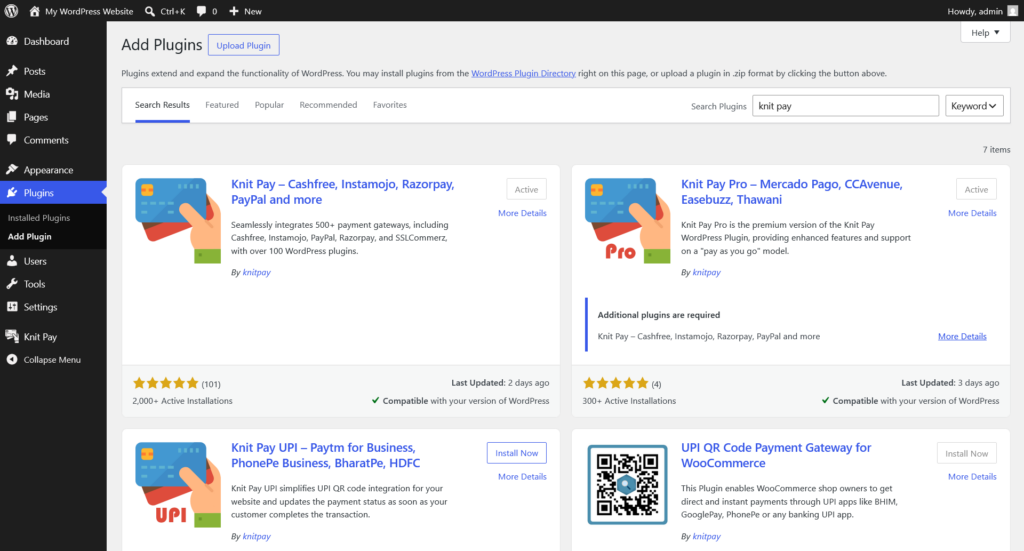
Log in to your WordPress admin dashboard. Go to Plugins > Add New, search for “Knit Pay”, and install it. The core plugin is free and available directly from WordPress.org. Activate it once installed.
Knit Pay is actively maintained and supports the latest PHP and WordPress versions. You never have to write or update integration code yourself — the plugin handles compatibility for you.
Step 3 — Configure Your Real Payment Gateway
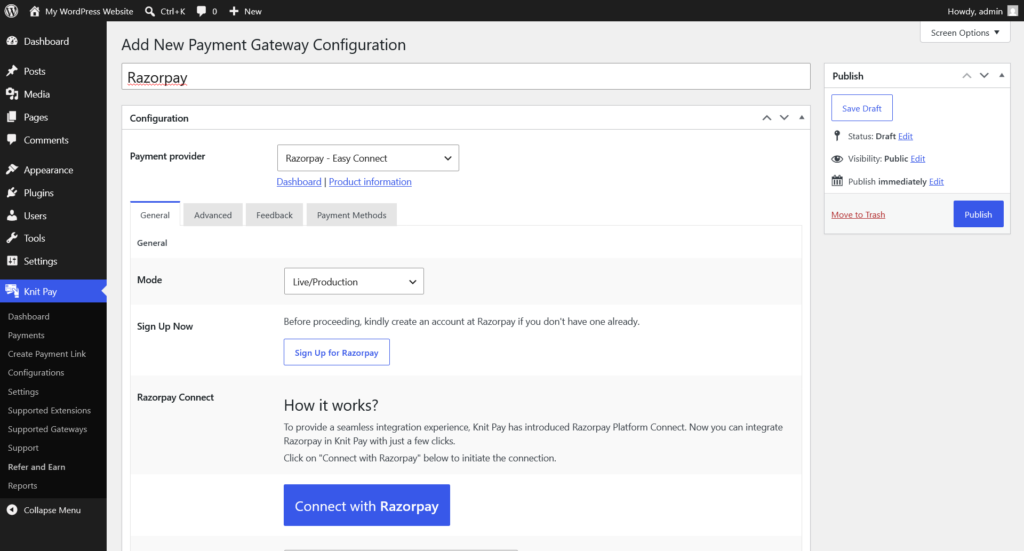
Before connecting OrderBox, you need to set up the actual payment gateway you want to use. In Knit Pay, go to Knit Pay > Configurations > Add New Payment Gateway Configuration.
Select your gateway from the list. A few popular examples:
- Razorpay — Indian and import flow for non-Indian businesses.
- Stripe — Global coverage, supports cards, wallets, and local methods.
- PayPal — Supports cards, Venmo, Apple Pay, Google Pay, iDEAL, BLIK, ACH, Bancontact, and 40+ more methods.
- PayU — Strong in India and Latin America.
- Cashfree — Popular for Indian businesses.
- PhonePe — Deep UPI and wallet integration for Indian merchants.
Enter your API keys or credentials for the chosen gateway and save the configuration. Knit Pay will validate the credentials automatically.
Step 4 — Connect OrderBox and Knit Pay (Two Tabs)
This is the most important step. You will work across two browser tabs — one for your WordPress Knit Pay dashboard and one for your OrderBox Reseller Control Panel. The trick is to start in Knit Pay first, because the Gateway URL is already visible before you even save anything.
Tab 1 — Knit Pay: Get the Gateway URL
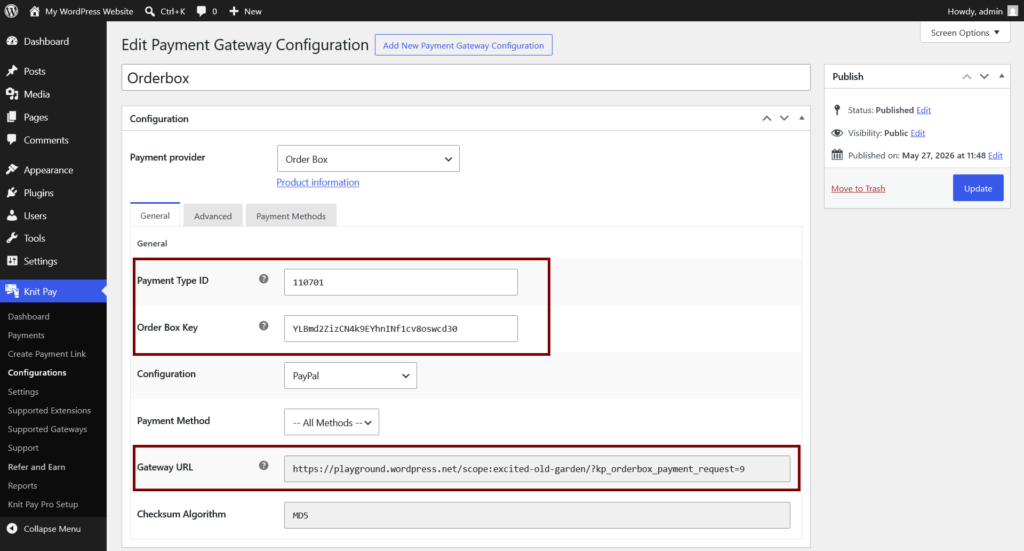
In your WordPress dashboard, go to Knit Pay > Configurations > Add New Payment Gateway Configuration and select OrderBox as the provider.
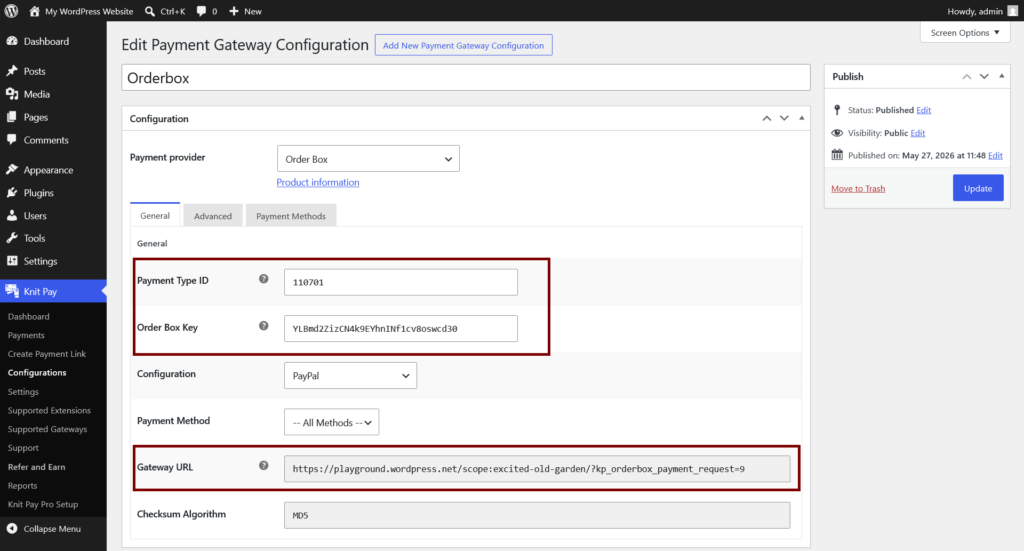
You will see a few fields. The important one right now is the Gateway URL. Knit Pay generates this automatically the moment you open the Add New Payment Gateway Configuration page — you do not need to fill anything else first. Just copy this URL to your clipboard and leave the tab open.
You can also fill in the optional fields now or later:
- Configuration — Select the real payment gateway you set up in Step 3. This tells Knit Pay where to route the money.
- Transaction Fees Percentage — Add a fee on top of the OrderBox amount (for example, 2.36 for 2% + GST).
- Transaction Fees Fix Amount — Add a flat fee (for example, 5 for ₹5 extra per transaction).
- Gateway Currency and Exchange Rate — Useful if your OrderBox currency differs from your gateway currency.
Leave the Payment Type ID and Order Box Key fields empty for now. You will get those values from OrderBox in a moment.
Tab 2 — OrderBox: Create and Save the Custom Gateway
Switch to your OrderBox control panel. Go to:
Settings > Finance and Billing > Payment Gateway > List / Add
Click Add a Gateway, then select Add any other Payment Gateway.
Fill in the fields once, using the real Gateway URL from Knit Pay:
- Gateway Name — This is what your customers see at checkout. Name it after your real gateway, like “Razorpay”, “Stripe”, or “PayPal”.
- Gateway URL — Paste the URL exactly as Knit Pay generated it in Tab 1. Do not add or remove anything after the last part of the URL.
- Payment Gateway Access Level — Choose who can use this gateway: Customers, Sub-Resellers, or both.
- Checksum Algorithm — Select MD5.
Save the gateway. If you are not already on the Payment Gateway list page, go back to Settings > Finance and Billing > Payment Gateway > List / Add. Then click the Manage button next to the gateway you just created. This opens the Custom Payment Settings page where you will find two critical values:
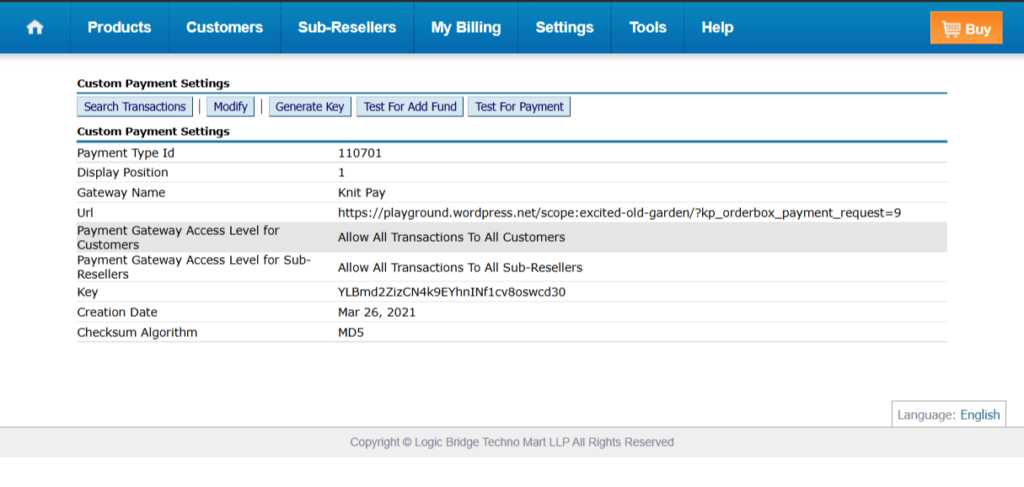
- Payment Type ID — A number assigned to this gateway.
- Key — A secure 32-character alphanumeric string.
Copy both values and switch back to the Knit Pay tab.
Back to Tab 1 — Knit Pay: Paste and Save
In the Knit Pay OrderBox configuration, paste the Payment Type ID and Order Box Key you just copied from OrderBox. Then click Save.
That is it. Both systems are now linked with a single save on each side. No temporary placeholders, no second editing round.
Step 5 — Test the Integration
Back in your OrderBox Payment Gateway settings, click the Manage button next to the gateway you just added. Then click either Test for Add Funds or Test for Payment.
This will simulate a real transaction and redirect you through Knit Pay to your actual payment gateway. Complete the test payment using a small amount or your gateway’s sandbox mode. If everything is configured correctly, you will be redirected back to OrderBox and the test transaction will show as successful.
If something goes wrong, double-check:
- The Payment Type ID matches between OrderBox and Knit Pay.
- The Order Box Key is copied exactly without extra spaces.
- The Gateway URL matches exactly what Knit Pay generated, with nothing added or removed at the end.
How the Payment Flow Works Behind the Scenes
Your customer never notices anything unusual. Here is exactly what happens:
- Customer clicks Pay Now on your Supersite storefront or WebPro Panel.
- OrderBox redirects them to the Gateway URL on your WordPress site.
- Knit Pay silently receives the transaction details and verifies the secure MD5 checksum to make sure the data was not tampered with.
- Knit Pay redirects the customer to the real payment gateway checkout page — Razorpay, Stripe, PayPal, or whichever you configured.
- Customer enters their card details or uses UPI, Apple Pay, Google Pay, etc.
- The payment gateway sends the result back to Knit Pay.
- Knit Pay redirects the customer back to OrderBox with the final status and a fresh secure checksum.
- OrderBox marks the invoice as paid, failed, or pending automatically.
At no point does your customer see “Knit Pay” anywhere. They see your brand name and the payment gateway’s checkout page. Knit Pay operates invisibly in the background.
What Makes Knit Pay Better Than Custom Integration
- No coding — You configure, not code. No PHP files, no checksum math, no manual bridge pages.
- 500+ payment gateways — One plugin connects you to Razorpay, Stripe, PayPal, PayU, Cashfree, PhonePe, and hundreds more.
- Unified dashboard — All transactions from all gateways and all integrations are visible in one Knit Pay Payments screen inside WordPress.
- Reports — Track transaction growth and trends from the Reports page.
- Auto currency conversion — If a customer pays in a currency your gateway does not support, Knit Pay automatically converts the amount using live exchange rates.
- No Knit Pay branding — Customers never see the Knit Pay name or logo.
- Always updated — The plugin is maintained for the latest PHP and WordPress versions. You don’t rewrite code when something changes.
Free vs Pro — What You Actually Get
Knit Pay (Free) covers the most popular gateways and integrations at no cost:
- Cashfree
- Instamojo
- PayPal — with 50+ payment methods including cards, Venmo, Apple Pay, Google Pay, ACH, and more.
- Razorpay — Indian flow and import flow for non-Indian businesses.
- SSLCommerz — for Bangladesh.
- Stripe Connect — for Indian businesses.
Knit Pay Pro unlocks premium gateways and advanced features for businesses that need more:
Global gateways: Stripe, PayStack, Flutterwave, PayTR, Elavon, CyberSource, SumUp, Midtrans, Paddle, Revolut, iyzico, Mercado Pago, Worldline Saferpay, RedSys, and 100+ more.
Indian gateways: PhonePe, PayU, CCAvenue, Easebuzz, Paytm, HDFC, ICICI, SBI, and more.
Crypto gateways: Coinbase Commerce, CoinPayments, CoinGate, Blockonomics, Binance Pay, and more.
Advanced features: Currency conversion, transaction fees, payment method filtering, detailed reports, and priority support.
Important: Knit Pay Pro is completely free for small businesses up to 25 transactions per month. No credit card required to start. If you are a growing reseller, you can try every Pro feature without paying a single rupee or dollar until you cross that threshold. This makes it perfect for agencies and startups testing the waters.
You can explore Pro details here: WordPress.org.
The Bottom Line
Integrating a modern payment gateway with ResellerClub, LogicBoxes, OrderBox, Supersite, WebPro Panel, or TrustP does not have to be a developer-only task. With Knit Pay, you set up the connection once through a simple configuration screen, and your customers can pay you through the provider of your choice — while OrderBox continues to handle your invoices and subscriptions just like before.
No custom code, no checksum headaches and no maintenance when PHP or WordPress updates. Just a clean bridge that works.
Ready to get started? Install Knit Pay from the WordPress plugin directory, connect your gateway, and paste the Gateway URL into your OrderBox panel. Your first test payment should be live in under 15 minutes. If you need help, contact our support team.
Happy reselling!